

What is Anti-Meta Madness in Pokémon Champions Battle Team?
One of my favorite things about competitive Pokémon is finding teams that go against the normal meta, and this Pokémon Champions Battle Team certainly fits that description. Featuring Mega Staraptor, Hippowdon, Glimmora, Gholdengo, Mimikyu, and Tyrantrum, Anti-Meta Madness combines poison, Sand, bulk, and some surprising offensive threats into one of the most unique teams I have used.
After going roughly 30–7 overall with the team, including a 4–1 run while recording a video, I wanted to break down how each Pokémon works and how all six pieces come together.
Before We Break Down the Team
Before getting into everything, I want to make one thing clear: I am by no means an expert competitive Pokémon player. These Battle Team Setup articles are about sharing teams I have tried, explaining how I have learned to use them, and hopefully helping other players who want to give them a shot. There are always going to be different ways to approach matchups, leads, and individual turns.
I also cannot take credit for creating this team. Tatsuya Watanuki created and piloted the original composition, finishing 64th in Champion Tier with a team featuring several Pokémon that see very little competitive usage, particularly Hippowdon and Tyrantrum. Watanuki has a history of finding success with unconventional Pokémon, and Anti-Meta Madness is another great example of creative team building at a high competitive level.
I also want to give a special shoutout to Aaron “Cybertron” Zheng. His Pokémon Champions Road to Ranked video showcased Watanuki’s team and provided an excellent breakdown of how the different pieces work together. His explanation of the team and its potential strategies was a major resource in helping me learn how to use it before putting in dozens of battles myself.
With the proper credit out of the way, let’s get into what makes Anti-Meta Madness work.
Team Characteristics
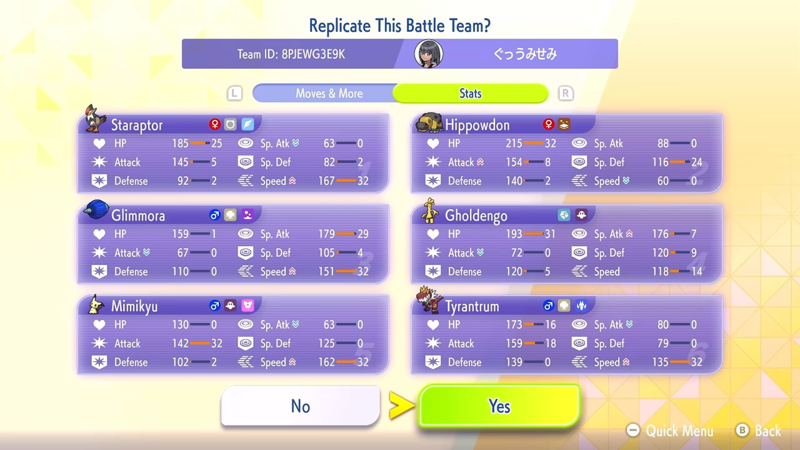
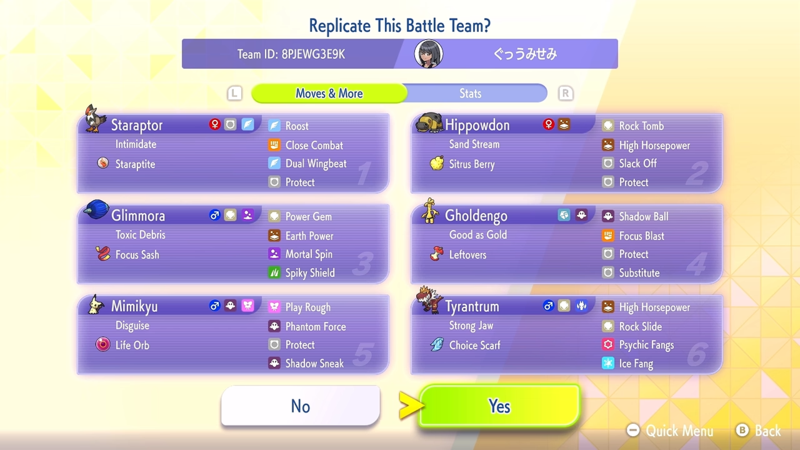
The main characteristic of this team is its ability to create constant residual damage through a combination of poison and Sand. Glimmora plays a major role in accomplishing this with Mortal Spin, which can poison both opposing Pokémon. Hippowdon adds another layer of passive damage through Sand Stream, automatically creating a sandstorm when it enters the battle.
When these two effects are working together, opposing Pokémon can quickly find themselves losing health without being directly attacked. Hippowdon can then use Protect and Slack Off to remain on the field while the opposing team continues taking damage. Its Sitrus Berry provides another source of recovery and makes an already bulky Pokémon even more difficult to remove.
Gholdengo takes this strategy even further. Instead of the more offensive Gholdengo builds players may be accustomed to, this version uses Leftovers alongside Substitute and Protect. The idea is to place Gholdengo behind a Substitute after Glimmora has spread poison and then use Protect and Leftovers to extend its time on the battlefield. Every extra turn allows poison and potentially Sand to continue chipping away at the opposing team.
However, residual damage is only one way this team can win. Mimikyu and Tyrantrum give the team significantly more immediate offensive pressure. Mimikyu combines Life Orb with Play Rough and Phantom Force while having Shadow Sneak available for priority. Tyrantrum uses a Choice Scarf and takes advantage of Strong Jaw to increase the power of Psychic Fangs and Ice Fang. Ice Fang is particularly useful against Pokémon such as Garchomp, while Psychic Fangs can also break through opposing screens.
Then there is Mega Staraptor, which is arguably the team’s most important late-game Pokémon. Instead of always leading with Staraptor and immediately applying pressure, the goal is often to save it until the opposing team has already been weakened. Once Staraptor enters against damaged Pokémon, it can begin securing knockouts with Close Combat while becoming increasingly difficult for the opponent to deal with. Roost gives it a way to recover health, while Dual Wingbeat provides another offensive option and is especially useful against Focus Sash users.
This creates two very different ways to approach a battle. Glimmora, Hippowdon, and Gholdengo can play a slower game built around poison, Sand, recovery, and Protect. Meanwhile, Tyrantrum, Mimikyu, and Mega Staraptor provide the offensive tools needed when waiting for residual damage is not the best option.
Mega Staraptor
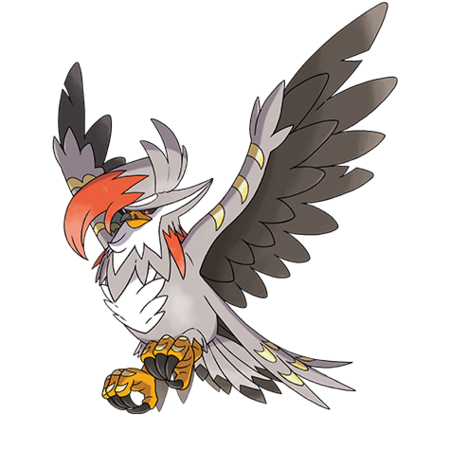
Staraptor is the team’s Mega Evolution and uses Intimidate before Mega Evolving. It holds Staraptite and has a Jolly Nature, with its EVs focused heavily on HP and Speed. The investment gives Staraptor the combination of bulk and Speed it needs to function as the team’s primary mid-to-late-game closer.
Its moves are Roost, Close Combat, Dual Wingbeat, and Protect. Close Combat is one of the most important attacks on the set, allowing Staraptor to deal significant Fighting-type damage. Dual Wingbeat provides Flying-type coverage and hits twice, making it especially useful against Pokémon relying on Focus Sash. Roost gives Staraptor something that many offensive Pokémon lack: reliable recovery.
That recovery becomes particularly valuable because this Staraptor is not designed simply to enter the field, deal as much damage as possible, and disappear. The team wants to weaken opposing Pokémon first and then put Staraptor into a position where it can secure knockouts and become increasingly difficult to remove.
Protect rounds out the moveset and can buy another turn of poison or Sand damage when those strategies are active. It can also protect Staraptor while its partner attacks or help determine what the opponent intends to do.
Despite Staraptor being the team’s Mega Evolution, you do not necessarily need to bring it into every matchup. Ghost types, certain Fairy types, and Pokémon such as Milotic can make using Staraptor more complicated. However, when the opposing team lacks a reliable answer, Mega Staraptor can quickly become the team’s primary win condition.
Hippowdon
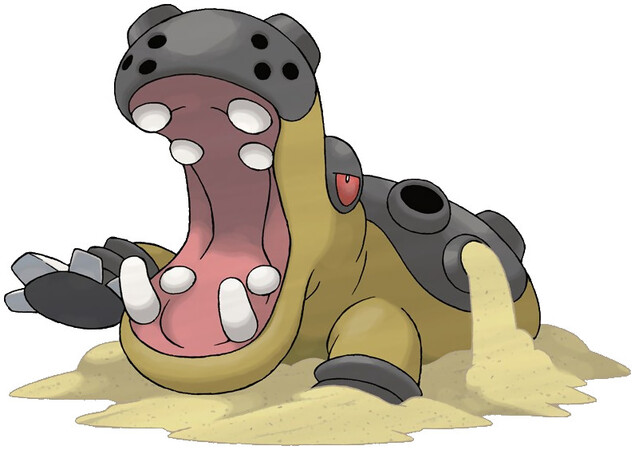
Hippowdon is a Ground-type Pokémon and one of the most unusual members of this team. It holds a Sitrus Berry and uses Sand Stream, which immediately creates a sandstorm when Hippowdon enters the field. It has a Brave Nature, and its EV investment emphasizes HP and Special Defense while adding some Attack.
The main reason for using Hippowdon instead of the more common Tyranitar is survivability. Tyranitar provides significantly more immediate offensive pressure, but its weaknesses can make it difficult to keep on the field. Hippowdon trades some of that offense for the ability to absorb attacks and recover its health.
Its moves are Rock Tomb, High Horsepower, Slack Off, and Protect. High Horsepower is Hippowdon’s primary Ground-type attack and allows it to deal respectable damage without needing to be the team’s main offensive threat. Rock Tomb provides additional coverage while also lowering the target’s Speed, which can help teammates such as Gholdengo move before Pokémon they normally would not.
Slack Off is perhaps the most important part of the set. Combined with Sitrus Berry and Protect, Hippowdon can remain on the battlefield for a long time. If Glimmora has already poisoned the opposing Pokémon, Hippowdon can alternate between Slack Off and Protect while Sand and poison steadily drain their health.
Its Brave Nature also gives Hippowdon an interesting role against Trick Room teams. Because it is naturally slow, Trick Room can actually allow Hippowdon to move before opposing Pokémon that would normally outspeed it.
Hippowdon is unlikely to single-handedly sweep an opposing team. Instead, its job is to survive, disrupt the opponent’s Speed with Rock Tomb, create Sand, and slowly put opposing Pokémon into range for the team’s stronger attackers.
Glimmora
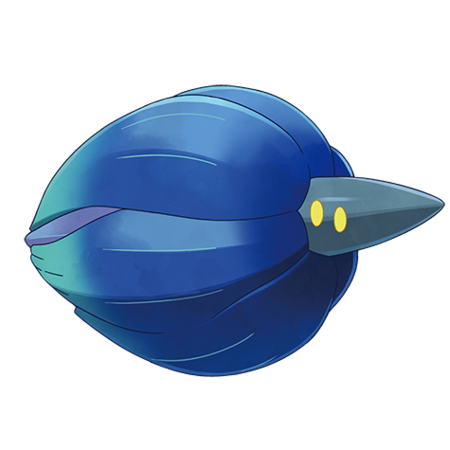
Glimmora is a Rock/Poison-type Pokémon and arguably the Pokémon that makes the team’s entire residual-damage strategy possible. It holds a Focus Sash, has a Timid Nature, and invests heavily in Special Attack and Speed. Its ability is Toxic Debris, giving opponents another reason to be cautious about hitting Glimmora with physical attacks.
Its moves are Power Gem, Earth Power, Mortal Spin, and Spiky Shield. Power Gem serves as Glimmora’s primary Rock-type attack, while Earth Power gives it valuable Ground-type coverage against Pokémon that resist or threaten its other attacks.
Mortal Spin is what separates this Glimmora from more traditional offensive versions. The move allows Glimmora to spread poison, creating the residual damage that Hippowdon and Gholdengo are designed to exploit. In many battles, Glimmora can lead and immediately use Mortal Spin to begin putting the opposing team on a timer.
Spiky Shield provides Glimmora with its defensive option and works particularly well with the team’s overall strategy. Every turn Glimmora can avoid damage potentially means another turn of poison or Sand damage for the opponent.
However, Mortal Spin should not become an automatic first-turn decision. Glimmora still has considerable offensive potential with Power Gem and Earth Power. If immediately attacking gives you a knockout or significantly better board position, there is no reason to force the poison strategy simply because it is available.
Gholdengo
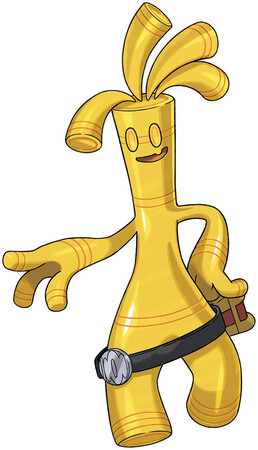
Gholdengo is a Steel/Ghost-type Pokémon and uses one of the strangest sets on the entire team. It holds Leftovers, has a Modest Nature, and uses Good as Gold. Its EV spread focuses heavily on HP while distributing additional investment across Defense, Special Attack, Special Defense, and Speed.
The moveset consists of Shadow Ball, Focus Blast, Protect, and Substitute. Most notably, there is no Make It Rain. Instead of being built around overwhelming opponents with immediate Steel-type damage, this Gholdengo is designed to survive and allow residual damage to accumulate.
Shadow Ball provides Gholdengo with its consistent STAB attack, while Focus Blast gives it an answer to Dark-type Pokémon that would otherwise cause serious problems. Kingambit is a great example. A Kingambit may attempt to threaten Gholdengo with Sucker Punch, but Substitute can punish that decision. Once Gholdengo is safely behind a Substitute, Focus Blast can threaten the Dark-type in return.
Of course, Focus Blast comes with the drawback of its imperfect accuracy, meaning it should not be treated as something you want to rely on unnecessarily.
Substitute, Protect, and Leftovers form the core of the set. After Glimmora has poisoned the opponent, Gholdengo can create a Substitute and begin extending the battle. Protect creates another turn of recovery from Leftovers while simultaneously allowing poison and Sand damage to accumulate.
Glimmora and Gholdengo consequently make one of the team’s strongest opening combinations. Glimmora threatens Mortal Spin while Gholdengo begins setting up the defensive position that can make removing it increasingly frustrating.
Mimikyu
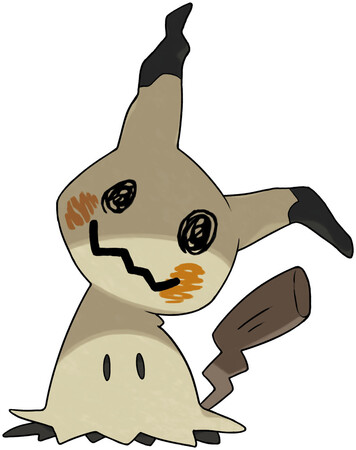
Mimikyu is a Ghost/Fairy-type Pokémon and provides the team with immediate physical offense. It holds a Life Orb, uses Disguise, and has a Jolly Nature with maximum investment in Attack and Speed.
Disguise is one of Mimikyu’s greatest advantages because it gives the Pokémon protection from the first damaging attack that hits it. That extra layer of safety can allow Mimikyu to play far more aggressively than many other offensive Pokémon.
Its moves are Play Rough, Phantom Force, Protect, and Shadow Sneak. Play Rough provides powerful Fairy-type damage and can secure one-hit knockouts against targets weak to Fairy attacks. Even when it does not score the knockout, it can still deal significant damage.
Phantom Force gives Mimikyu a powerful Ghost-type option with some additional utility. Mimikyu disappears on the first turn before attacking on the next, and the move can break through Protect. This can be particularly useful against defensive opponents attempting to stall turns.
Shadow Sneak provides priority, allowing Mimikyu to finish weakened Pokémon before they have an opportunity to move. That makes it an excellent fit for a team already focused on gradually reducing the opponent’s health.
This is where Glimmora’s poison can become particularly valuable. Play Rough may occasionally leave an opposing Pokémon just outside knockout range. If that Pokémon has already taken poison or Sand damage, however, the same attack may suddenly be enough to secure the knockout.
Mimikyu does struggle against Intimidate and extremely bulky physical Pokémon. Life Orb also means every attack costs some of its own health, so you want to make sure Mimikyu is accomplishing something meaningful while it is on the field.
Tyrantrum
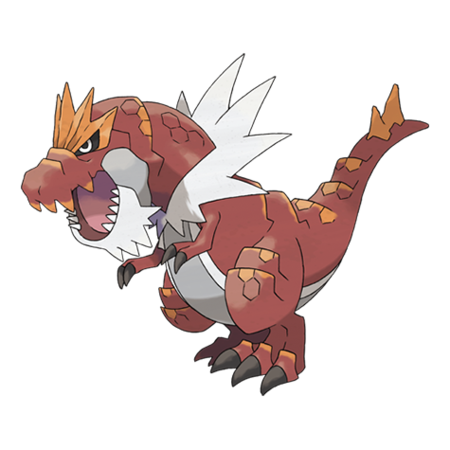
Tyrantrum is a Rock/Dragon-type Pokémon and easily one of the most unexpected Pokémon on this team. It holds a Choice Scarf, has a Jolly Nature, and uses the Strong Jaw ability. Its EVs provide maximum Speed alongside investment in HP and Attack.
Its four attacks are High Horsepower, Rock Slide, Psychic Fangs, and Ice Fang. Because Tyrantrum holds a Choice Scarf, it is locked into whichever move it selects until it leaves the field. In exchange, the additional Speed allows Tyrantrum to put immediate pressure on Pokémon that might otherwise move before it.
Strong Jaw is the biggest reason Tyrantrum’s moveset works. The ability increases the strength of biting moves, which makes Psychic Fangs and Ice Fang particularly threatening. Psychic Fangs also has the benefit of destroying screens, while Ice Fang provides important coverage against Pokémon such as Garchomp.
In fact, this Tyrantrum has enough HP investment to survive a Jolly Life Orb Garchomp’s Earthquake under the calculations used when the team was built. Ideally, however, Tyrantrum does not want to absorb that attack at all. With Choice Scarf and Ice Fang, it can instead threaten Garchomp before it has the opportunity to attack.
Rock Slide provides spread Rock-type damage and is particularly useful against Pokémon such as Charizard. High Horsepower rounds out the set with Ground-type coverage, although these attacks do not receive the Strong Jaw boost and can feel noticeably weaker than Tyrantrum’s biting moves.
Tyrantrum works particularly well when the opponent has limited Speed control. Pairing it with Mimikyu creates one of the team’s most aggressive potential leads, allowing you to abandon the slower poison strategy and immediately put substantial physical pressure on the opponent.
How to Use the Team
One of the most reliable starting points is Glimmora and Gholdengo. Glimmora can immediately threaten Mortal Spin, while Gholdengo can use Substitute or Protect and begin taking advantage of the poison damage. Leftovers helps Gholdengo recover while the opposing Pokémon gradually lose health.
Mega Staraptor works extremely well in the back with this combination. Rather than exposing it early, Glimmora and Gholdengo can weaken the opponent until Staraptor reaches a position where Close Combat or Dual Wingbeat can begin securing knockouts. Mimikyu is another strong fourth Pokémon because Shadow Sneak can clean up opponents that barely survive the team’s earlier damage.
Glimmora and Hippowdon provide an even more defensive opening. Glimmora spreads poison while Sand Stream immediately begins adding sandstorm damage. Hippowdon can then use Slack Off and Protect to remain healthy while the opponent is slowly worn down. This combination becomes more attractive against slower teams, although bulky Water- and Grass-type Pokémon can make it considerably more dangerous.
For a completely different approach, Tyrantrum and Mimikyu can be used together as an aggressive lead. Choice Scarf allows Tyrantrum to immediately threaten faster Pokémon, while Disguise gives Mimikyu some protection as it starts applying physical pressure. Mega Staraptor can also be incorporated into these aggressive combinations when Intimidate or immediate offense is more useful than the residual-damage plan.
The important thing is recognizing that there is no single combination you need to bring to every battle. Sometimes poison and Sand will control the game. Sometimes Tyrantrum and Mimikyu can simply start taking knockouts. Other times, the entire game plan revolves around creating an opening for Mega Staraptor.
That versatility was something I noticed throughout my own time using the team. With around 37 games played, I found that trying to force the same lead or strategy every time was far less effective than looking at the opposing six Pokémon and deciding whether I wanted to play aggressively or win through residual damage.
Team Weaknesses
Every team has weaknesses, and Corviknight is arguably the biggest problem for this one. Corviknight cannot be poisoned and does not take Sand damage. This immediately removes two of the team’s primary ways of wearing down opposing Pokémon. Its natural bulk also makes quickly removing it difficult.
Gholdengo is one of the better tools available against Corviknight, so preserving it can become extremely important in that matchup. Instead of relying on residual damage, aggressively doubling into Corviknight with attacks such as Glimmora’s Power Gem and Gholdengo’s Shadow Ball may be necessary.
Bulky Water types are another concern. Pokémon such as Milotic, Mega Blastoise, and Mega Swampert can absorb the team’s attacks while threatening significant damage in return. The team does not have many natural Water resistances, which makes positioning against these Pokémon especially important.
There are also individual limitations to keep in mind. Mega Staraptor dislikes Ghost- and Fairy-type matchups. Mimikyu can struggle against Intimidate and physically defensive Pokémon. Tyrantrum’s High Horsepower and Rock Slide do not benefit from Strong Jaw and consequently lack some of the power of its biting attacks. Hippowdon is extremely bulky but very slow and does not provide overwhelming offensive pressure.
The biggest challenge, however, may simply be learning when to use each part of the team. This is not necessarily a beginner-friendly composition. There are several different strategies happening simultaneously, and trying to force the same plan every battle can quickly work against you.
That is especially important with the poison and Sand strategy. It can be tempting to believe every battle requires Mortal Spin followed by several turns of stalling. That is not always the case. Glimmora’s Power Gem, Gholdengo’s Shadow Ball, Mimikyu, Tyrantrum, and Mega Staraptor give the team enough offense to simply attack when the matchup calls for it.
Wrap-Up
After going roughly 30–7 overall with this team, including a 4–1 run while recording a video, I came away extremely impressed with how well everything works together. What initially caught my attention was simply how strange the team looked. After actually playing it, I quickly realized there is much more going on than throwing a few off-meta Pokémon onto the same team.
The combination of poison, Sand, Substitute, recovery, and Protect can make opponents feel like they are constantly losing health while accomplishing very little in return. At the same time, I never felt completely dependent on that strategy. There were plenty of situations where attacking immediately with Mimikyu or Tyrantrum was the better decision, while Mega Staraptor became an excellent way to close games once the opposing team had been weakened.
That flexibility was probably what impressed me the most. I could play a slower battle with Glimmora, Hippowdon, and Gholdengo. Or completely change the pace and start applying immediate offensive pressure. With only around seven losses across roughly 37 battles, the results certainly backed up how strong the team felt while I was using it.
Once again, huge credit goes to Tatsuya Watanuki for creating and piloting the team. Also to Aaron “Cybertron” Zheng for showcasing it and providing such a detailed breakdown of how to use it. I may have picked up this team because of how unusual it looked, but after spending this much time with it, Anti-Meta Madness turned out to be one of the most successful and enjoyable Pokémon Champions teams I have used.
