These Blunt Punch combos completely changed how I approached the combat system in Jay and Silent Bob: Chronic Blunt Punch. At first, the game feels like a chaotic button masher, but the deeper I got into it, the more I realized there is a surprisingly technical combat system hiding underneath all the absurd humor and references.
A lot of that depth comes from how the game handles directional inputs, combo states, and movement precision. The move lists themselves only tell part of the story. Once I started understanding what each combo was actually designed to do, the combat immediately became much more satisfying.
Using the D-Pad
The biggest breakthrough, honestly, was abandoning the analog stick entirely and switching to the D-pad.
If you want my broader thoughts on the game overall, including the humor, boss fights, presentation, and how the combat evolves throughout the campaign, you can also check out my full review of Jay and Silent Bob: Chronic Blunt Punch.
Also, disclaimer: I made up the names for these combos to help me remember them
Silent Bob Blunt Punch Combos
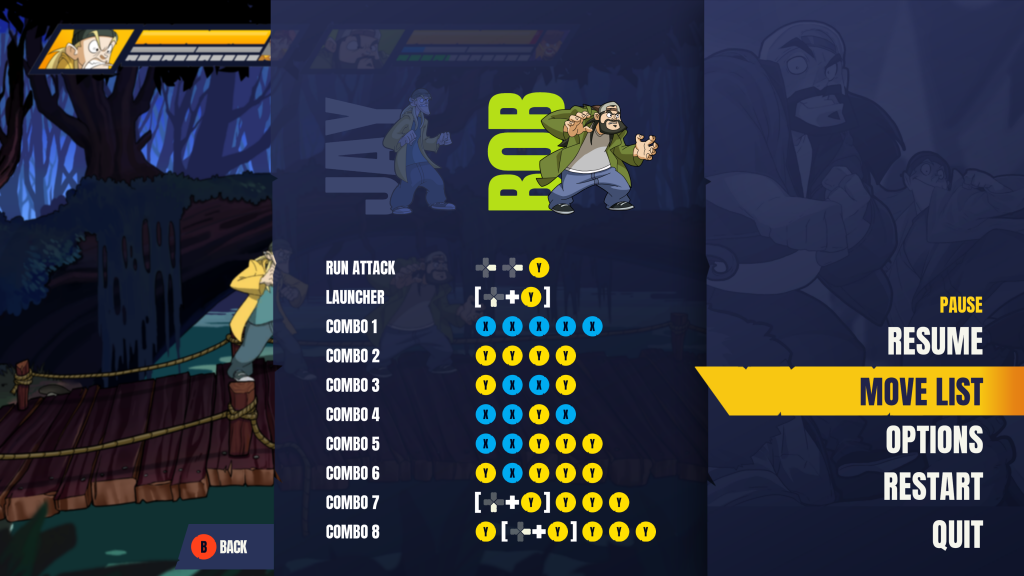
These Blunt Punch combos for Silent Bob feel slower and heavier at first, but they become incredibly effective once the combat system starts clicking.v
1. Light Combo – X X X X X
This is Silent Bob’s safest all-purpose combo. It comes out quickly, keeps pressure consistent, and works well when you are trying to stabilize crowded fights without heavily committing yourself.
Early on, this became one of my most reliable tools because it lets you maintain momentum without leaving yourself wide open afterward.
2. Spinning Lariat – Y Y Y Y
This combo was the move that finally convinced me the game was designed around D-pad play.
While using the analog stick, I could barely get this attack to trigger consistently. The second I switched fully to the D-pad, it suddenly became dramatically more reliable. That alone completely changed how I approached the combat system.
The move itself feels heavily inspired by classic arcade-fighter lariat attacks and works especially well against clustered enemies. This is also my go-to move when I want to inflict maximum combo damage. This one gets your assist gauge filled pretty quickly.
3. Hockey Slap – Y X X Y
Hockey Slap sits comfortably between speed and power. It became one of my favorite pressure tools because it lets you stay aggressive without overcommitting too heavily. The timing is a bit tricky, so practice it.
4. Thunder Clap – X X Y X
Thunder Clap feels more like a long-form combo starter and less like a burst interruption tool.
It hits quickly, stabilizes pressure, and helps regain control once encounters begin getting chaotic. In larger fights, this became useful whenever enemies started crowding me too aggressively. The timing is also a bit tricky, so practice.
5. Barrel Roll – X X Y Y Y
Barrel Roll exposed just how sensitive the game is to directional inputs.
While using the analog stick, I constantly triggered the wrong combo because the game interpreted slight movement as an entirely different command. Once I switched fully to the D-pad, the move suddenly became much easier to execute consistently.
This was one of the moments that really made me realize the game behaves more like a lightweight arcade fighter than a traditional beat-em-up.
6. Towel Slap – Y X Y Y Y
This combo looks completely ridiculous, but it is surprisingly effective for maintaining offensive pressure.
7. Stereo Smash (Uppercut Juggle) – Y Down+Y Y Y Y
Stereo Smash was one of the first moves that made me realize the game contains actual juggle mechanics underneath the surface.
Launching enemies into the air opens up a much more technical side of combat than the game initially suggests. Once I started experimenting with launchers and spacing, the combat system suddenly became much more interesting.
8. Heavy Combo – Y Left+Y Y Y Y
This is one of Bob’s more committed grounded strings. It works best when isolating stronger enemies or punishing large openings.
Like several of Bob’s heavier attacks, this combo becomes significantly more reliable once you stop using analog movement.
Jay Blunt Punch Combos
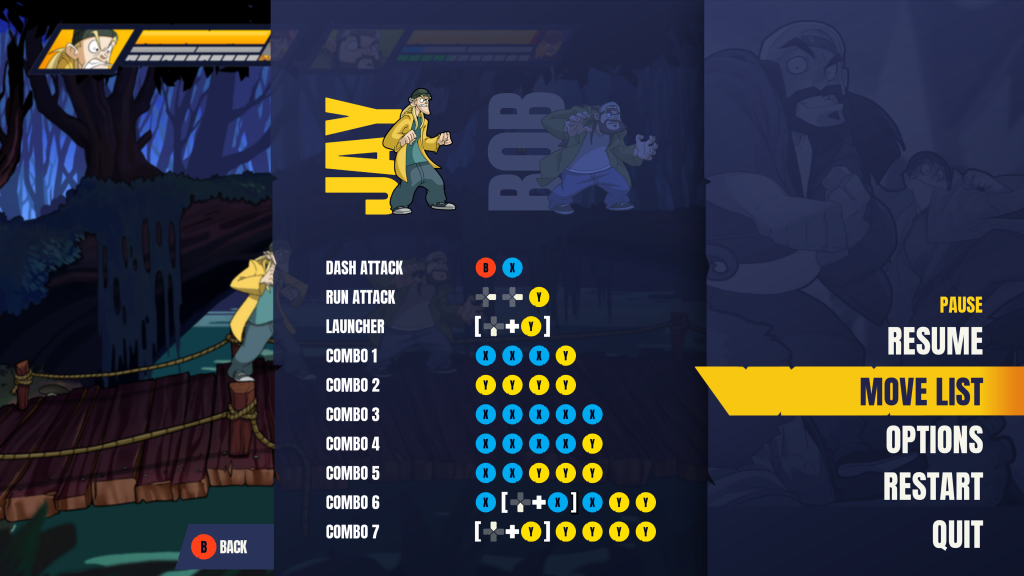
Jay’s Blunt Punch combos lean much more heavily into mobility, aggression, and arcade-fighter-style movement.
1. Bong Smash – X X X Y
This is probably the first combo most players will remember.
Jay strings together quick punches before smashing enemies with a giant bong. It is simple, fast, and surprisingly effective during the early game.
2. Karate Kick – Y Y Y Y
Karate Kick functions as Jay’s straightforward heavy-pressure combo. It is reliable, aggressive, and especially useful against isolated enemies.
This became one of the easiest ways to maintain offensive pressure once I understood how the game rewards sustained combo momentum.
3. Roundhouse Finisher – X X X X X
This combo became one of my favorite crowd-control tools because of how effectively it stabilizes space.
Knocking enemies down gives you valuable breathing room during larger encounters, especially when fights begin getting overwhelming.
4. Hurricane Kick – X X X X Y
The inspiration here is obvious in the best way possible.
Hurricane Kick behaves almost exactly like an old-school arcade spinning kick attack and works beautifully for forward pressure and combo extension. This is one of the moves that really highlights how much fighting-game influence exists underneath the combat system.
5. Super Kick – X X Y Y Y
Super Kick acts as Jay’s burst-damage option. It is quick, aggressive, and works especially well as a finisher once openings appear.
This also became one of the easier combos to execute consistently once I fully committed to D-pad movement.
6. Shoryuken (Dragon Uppercut) – X Down+X X Y Y
This is probably the clearest example of the game borrowing directly from arcade fighter design.
It functions almost exactly like a rising dragon uppercut, launching enemies upward and creating juggle opportunities. Once I started experimenting with launch states and spacing, this became one of the most satisfying moves in the game.
7. Shienkyaku (Dragon Upperkick) – Up+Y Y Y Y Y
Shienkyaku leans heavily into vertical offense and aggressive air pressure.
Once I became more comfortable with the movement systems and directional precision, this move became significantly easier to use intentionally instead of accidentally.
Blunt Punch Combos and Super Moves
Jay’s supers fully embrace the game’s absurd energy.
Wolverine Barrel Roll, complete with its “Snikt Snikt” reference, is built around frantic movement and multi-hit pressure. Bluntman, meanwhile, acts as Jay’s heavy cinematic-style super and delivers massive damage once activated.
Both supers feel intentionally over-the-top in exactly the way you would want from a Jay and Silent Bob game.
My Most-Used Blunt Punch Combos
Interestingly, some of the attacks I relied on most throughout the game were not even traditional combo strings. They were running heavy attacks for both characters, and they gradually became some of the most important tools in my entire moveset whenever encounters started getting overwhelming.
For Jay, the running heavy transforms into a rushing dragon punch-style uppercut that became one of my favorite emergency tools once fights became chaotic. The move appears to have invincibility frames during portions of the animation, allowing it to cut through pressure much more safely, rather than trying to block or slowly reposition.
At the same time, Jay’s Combo 4, Hurricane Kick, became one of my most-used combo strings in the entire game. The move feels heavily inspired by old-school arcade spinning kick attacks and works beautifully once you start understanding how aggressively the combat system rewards forward momentum. During crowded fights, I found myself constantly returning to Hurricane Kick because it controlled space while still letting me stay offensive.
Silent Bob’s running heavy became equally important. His version behaves almost like a Blanca-style barrel roll, aggressively launching him forward while disrupting enemy spacing and creating immediate breathing room.
Beyond that, Bob’s Combo 2, Spinning Lariat, consistently became one of my favorite attacks because of how many hits it could reliably connect against groups of enemies. Once the combat started getting more chaotic later in the game, this became one of the moves I trusted most for maintaining pressure and controlling crowds.
What makes all of these attacks so useful is that they naturally solve several combat problems at the same time. They reposition you, interrupt enemy momentum, create space, and help recover control once fights start spiraling into chaos.
By the late game, these honestly became some of the most important attacks in my entire moveset, and I found myself using them constantly whenever things started getting out of control.
Final Thoughts on These Blunt Punch Combos
The deeper I explored Jay and Silent Bob: Chronic Blunt Punch, the more I realized the combat system is far more technical than the game initially lets on.
At first glance, it feels chaotic and mash-heavy. But once you begin understanding directional precision, combo structure, juggling, and movement spacing, the game starts revealing a surprisingly layered combat system hiding underneath the comedy.
The biggest hurdle is simply that the game expects players to discover most of this themselves. A lot of these systems also changed how I felt about the game overall once the combat finally clicked, especially during the later boss encounters and multi-stage fights that I discussed more heavily in my full review.
Hopefully, these Chronic Blunt Punch combo tips help shorten that learning curve.
For more Chronic Blunt Punch tips, check out my Beginner Tips Guide.
1 comment
[…] Crusaders was interesting for me because I had just come off reviewing Jay and Silent Bob: Chronic Blunt Punch. My brain was already living in brawler mode. That made it easier to feel what Toxic Crusaders was […]
Comments are closed.